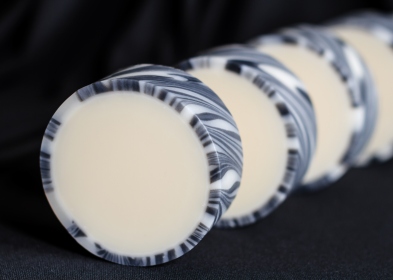
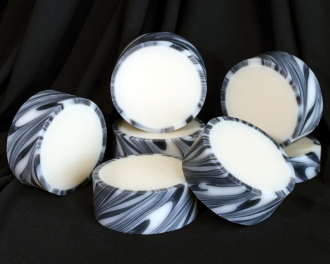
 This month, the Great Cakes Soap Challenge (hosted by Amy Warden of Great Cakes Soapworks) involved creating a rimmed soap. Our instructor was Tatsiana Serko of Creative Soaps by Steso. Not only does Tatsiana create amazing rimmed soaps, but all of her soaps are so artistic and beautiful. She provided us with a wonderful tutorial. All of the tips and help provided by both she and Amy Warden made this daunting technique seem a bit easier to tackle. I chose to make a charcoal and kaolin clay rim, then fill it with white soap using more kaolin clay. :)
Note: If you’re a beginner or want to learn more about soap making, check out these helpful videos:
Soap Queen TV – LYE SAFETY: http://goo.gl/FqA0Yt
Amanda Aaron of Lovin’ Soap – BEGINNER SERIES: http://goo.gl/DjTzuE
This technique was so much fun to learn and make. I’ll definitely be making it again.
RIM RECIPE
As recommended by both Tatsiana and Amy, the recipe needed to have about 45% hard oils and 55% soft oils, with about 10% of the soft oils being castor oil. Castor oil seems to help the soap be more pliable.
Sweet Almond Oil – 15%
Sunflower Oil – 10%
Avocado Oil – 10%
Castor Oil – 10%
Olive Oil – 10%
Organic Sustainable Palm Oil – 25%
Coconut Oil – 20%
You’ll see in the video below that I used Tatsiana’s technique for the rim (making a complete slab and then slicing off the soap to make the rim). I did not put my slab of soap in the oven, but I did cover it with a blanket and left it in a warm room overnight. Thankfully, it did completely gel. After I unmolded it and let it sit for a few hours, I was able to cut and roll it fairly easily. You’ll also see in the video the tool I used for slicing the soap. Tatsiana showed us how to use cork, guitar wire, and washers to make a fantastic flexible knife. It worked perfectly.
The inside of the soap was made using one of my regular soap recipes and scented with a custom blend of floral essential oils. This blend caused the center of the soap to turn a cream color (you’ll see this in the video). After about 2 days, the center lightened considerably, and I was able to take the photos you see in this post.
VIDEO
I made a video of my entire process and edited it down to about 7 minutes. You can see it here or on my YouTube channel.


Thank you for reading my post!


Simple, clean and very elegantly done. Love it!
LikeLike
Thank you!
LikeLike
Holly:
So beautiful! And you made it look so easy too!!
Definitely a winner!
Sly
LikeLike
Thank you so much, Sly!
LikeLike
Your soap is just stunning. Many congrats, Holly – this must be a winner! Thumbs up from Norway, you did a really, really good job, these are beautiful. Good luck 😊
LikeLike
Yvonne, thank you so much! That’s so sweet of you to say! :)
LikeLike
This could not be any more classy and elegant. Classic and beautiful <3
LikeLike
Thank you, Lisa!
LikeLike
Another beautiful soap! I love it’s simplicity.
LikeLike
Thank you!
LikeLike
Very elegant! Beautiful work Holly!
LikeLike
Thank you so much, Betty!
LikeLike
Your soap is beautiful. Very elegant and classy. I love the the charcoal and clay idea and your fragrance sounds beautiful too.
LikeLike
Thank you, Fran!
LikeLike
So gorgeous. I bet you will sell out quickly on these and they will be in demand by your customers.
Great/perfect job!
LikeLike
Thank you so much!
LikeLike
Love these, Holly! Beautiful and so well executed!
LikeLike
Thank you, Penny!
LikeLike
Absolutely beautiful Holly! Perfectly perfect.
LikeLike
Thank you, Mimi!
LikeLike
Stunning, incredibly clean execution and perfect photography — definitely a winning combination!
LikeLike
Thank you so much, Claudia!
LikeLike
It’s beautiful, Holly!!! Love the clean look of the black & white. And really glad you were able to use it as a restock – double duty! :)
LikeLike
Thank you so much, Amy! I wasn’t very confident I could do this, but the tutorial you and Tatsiana provided helped me through every single step. It was so much fun to make!
LikeLike
Stunning. Love the black and white. Your video makes it look so easy.
LikeLike
Thank you, Bonnie!
LikeLike
Amazing, elegant and.. tender… As usual. Love and voice)))
LikeLike
Thank you, Anastasia!
LikeLike
Love the black! Very pretty!
LikeLike
Thank you, Nicole!
LikeLike
So exquisitely beautiful, Holly! I absolutely love the powerful design you achieved from these classic colors. So incredibly well done!
LikeLike
Your soap is always perfect!
LikeLike
Absolutely beautiful Holly! I thoroughly enjoyed your video too, very calming. Love it💕
LikeLike
Thank you!! :)
LikeLike
A beautiful, elegant soap, Holly! Stunning
LikeLike
Thank you!
LikeLike
Oh my goodness, so beautiful!! Thank you very much.
I’d love to know how to make that guitar string, cork & washers slab cutter……
LikeLike
Congratulations)) I’m very happy for you, Holly! Enjoy, You deserve!
LikeLike
Thank you so much, Anastasia! Congratulations to you, too!
LikeLike
Your soaps are beautiful and I can’t thank you enough for taking your time in including your how-to videos. You are a professor of soapmaking.
LikeLike
Tanya, that is so sweet of you to say! Thank you! And thank you so much for watching my videos. :)
LikeLike
Pingback: How to make a Checker Board Design in Homemade Soap | Board Game
muchas gracias por compartir que hermoso trabajo
LikeLike
Where do you purchase the supplies used for your molds and wire soap cutter?
LikeLike
I purchased the wood molds and cutter on Etsy. The cutter is from Bud Haffner (https://www.etsy.com/shop/budhaffner) and the wood molds are from Kiwi & Company (https://www.etsy.com/shop/KiwiCompany).
LikeLike
Ex celente tu jabon y la explicación gracias
LikeLike
Pingback: Rimmed Soap | Cold Process | Soap Challenge Club
Pingback: DIY Cold Process Soap Tutorial | Wellness Mama | KitchenWare
Beautiful!! Which percentage of water and superfat? did you use in your recipe?
LikeLike
Thanks for sharing such a lovely recipe but when i tried it was breaking on winding. Can you please send me the exact ratio especially for the lye solution.
Are all oils to be used in the same exact amount ?
Please help me in making your brilliant soap
Thanks
Rubina Shah
LikeLike