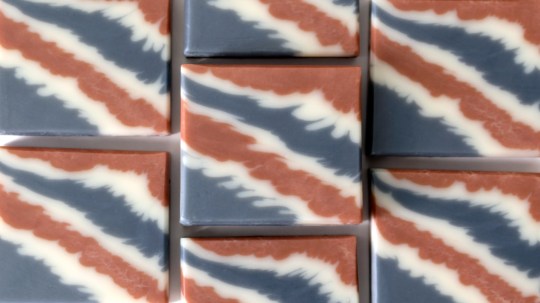
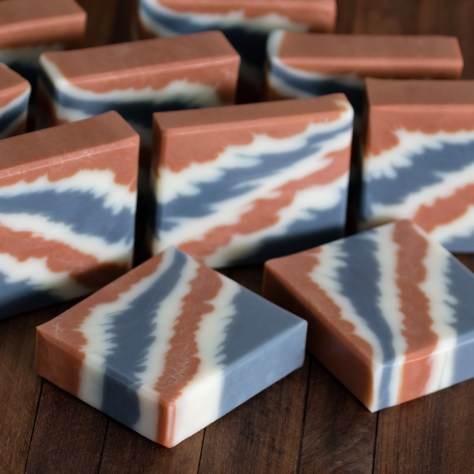
 In this month’s Soap Challenge Club, we learned a new technique called pointy layers. Our guest instructor was Teri Endsley of Tree Marie Soapworks. Teri has a wonderful YouTube channel and makes the most beautiful soaps. The pointy layers technique involves pouring lines of very fluid soap as close as possible to the layer below, while also leaving gaps of color showing (these form the points). Controlling trace and having a nice long spout were essential. In my attempt to get a swept look to my pointy layers, I decided to try a diagonal pour where I tilted my mold.
A big thank you to Teri for sharing this technique with us and to Amy Warden for hosting another fun Soap Challenge Club. :)
RECIPE
Olive Oil – 42%
Coconut Oil – 25%
Shea Butter – 10%
Sunflower Oil – 10%
Cocoa Butter – 5%
Avocado Oil – 4%
Castor Oil – 4%
5% superfat
Water = 2 x Sodium Hydroxide (33% lye solution)
My oils and lye were at about 78º Fahrenheit
Essential Oil Blend:
Orange – 2 parts
Rosemary – 2 parts
Peppermint – 1 part
COLORS
- Orange
- 1.5 teaspoons paprika infused sunflower oil per cup of soap
- orange essential oil added to this soap only
- 1 teaspoon hydrated illite clay per cup of soap
- 1/2 teaspoon hydrated pink kaolin clay per cup of soap
- Blue
- Indigo Root powder mixed in sunflower oil – 0.5 teaspoon per cup of soap
- Activated Charcoal mixed in sunflower oil – 0.5 teaspoon per cup of soap
I tilted my mold as close to 45º as possible. I used towels on both sides to keep it from falling. As I began pouring the lines of soap, I realized quickly that I could not reach the soap under the tilted mold (about 1/2″ as you can see in the photos below). The tip of my pouring spout just wouldn’t reach. I improvised with some disposable pipettes. Thankfully, the soap was thin enough and the pipettes worked for covering those small areas.


I did film my entire process and will hopefully have a video edited and posted early next week.
The pointy layer technique is really a lot of fun. As with most new techniques, I tried a couple of small batches first to figure everything out (how thin to pour, how close to get, etc). I would say my soap was at a light trace when I began pouring and stayed quite thin until the end.
Tilting the mold definitely allowed me to get really close to each layer. I think perhaps I got too close (or was too slow) while pouring the first orange layer, as the white layer below didn’t turn out as pointy as I’d hoped. Some of the orange soap also has glycerin rivers (towards the middle of the batch) thanks to the extra water I used with the clay. I used as little water as possible to hydrate the clay (for ease of blending), but the soap got quite hot during gel (warm room and wrapped up beside another batch of soap). Overall, I’m really happy with how they turned out and can’t wait to see all the other entries!
Here are the photos of my finished soaps:


Thank you so much for reading my post!


I love these, Holly!! The contrast of the white layers between the orange and indigo really helped set them off nicely and the diagonal orientation is also brilliant! I love that you shared what worked and what didn’t, and how you solved it – i.e. the pipette! The glycerin rivers just add to the design IMHO. :)
LikeLiked by 1 person
Thank you, Amy! 😊
LikeLike
Thank you for sharing this soap, and all about it : technique, photos, and the future video too :)
I wanted to try a soap like that, but i didn’t managed to, the soap was not enough fluid ! I’ll try a recipe like yours next time.
PS : Sorry for my english, I dont’ practice enough and I’m not sure of some words ^^
LikeLiked by 1 person
hi Holly, so nice as usual 😍
this is the 1st photo i told myself must vote for once the link-up visible
and before i know this is the job from u 😁
all the best!
LikeLiked by 1 person
Thank you so much, Patricia! ❤️
LikeLike
Thank you! ❤️
LikeLike
Hi Holly:
Thank you for sharing your process – your soap is lovely.
I look forward to (as I always do) your beautiful video.
Sly
LikeLiked by 1 person
Thank you so much, Sly!
LikeLike
Beautiful job, as usual!
LikeLiked by 1 person
Thank you so much, Kelley!!
LikeLike
Very pretty. I like the natural colors you use. Thank you for sharing the pipette trick.
LikeLiked by 1 person
Thank you!!
LikeLike
Thank you for sharing your process! I had thought about doing a diagonal pour too but wondered how it would be possible to pour the soap in the corners. What a great solution you came up with!! Your soaps turned out just lovely!! Well done!
LikeLiked by 1 person
Thank you so much, Helene!
LikeLike
Your soaps turned out beautiful Holly! I love the diagonal pour!
LikeLiked by 1 person
Thank you so much, Klaudia!
LikeLike
What amazing results, Holly! This was hard enough pouring with the mold straight. I can’t even imagine how difficult it was pouring at an angle. Though when you mentioned it being easier to get closer when the mold was tilted makes sense. Still, these turned out just fabulous, as always!
LikeLiked by 1 person
Thank you so much, Debi!
LikeLike
Wooowza Holly 😍😍 as always i am a huge fan of your work, i love the design and the colors 💖💖 And the tiny points in the layers are just amazing!! Thanks for sharing the whole process and i can’t wait to see the video 😘 🌷🌹
LikeLiked by 1 person
Thank you so much, Angelique! ❤️
LikeLike
Pingback: Video: Diagonal Pointy Layers | Soap Challenge Club | Kápia Méra
I really love how You did that! I saw Your video and it is amazing! When I will do that again I will do also diagonally :-).
LikeLiked by 1 person
Thank you!!!
LikeLike
How would you make the soap if you wanted straight diagonal colors?
LikeLike